4.6 KiB
Recommender Systems class
Department of Mathematics and Computer Science, Adam Mickiewicz University, 2021
Author: Piotr Zioło
Preparing your computer
-
Install Anaconda with Python 3.8.
-
Install Git.
-
Install PyCharm (community version).
-
Fork this repository to your GitHub account.
-
Go to the chosen folder on your machine where you want to have a local copy of the repository. Right-click in the folder and from the context menu choose "Git Bash Here". Run the following command to clone the forked repository on your GitHub account to your local machine:
git clone your_repository_address_which_you'll_find_in_your_github
Alternatively, open Git Bash (installed with Git), change the path to the folder where you want to have a local copy of the repository, execute the above command.
-
Prepare your conda environment (instructions given for Windows, but it should be similar on other systems):
-
Open Anaconda Prompt as administrator.
-
Make sure you're in the repository main folder. Run the following command:
conda env create --name rs-class-env -f environment.ymlYou can replace rs-class-env with your own environment name.
You may need to install a C++ compiler to install certain packages.
-
-
In Git Bash open the repository folder and activate just created environment with the following command:
conda activate rs-class-env -
In Git Bash type:
jupyter notebookA new tab with Jupyter Notebook should open in your browser.
-
In Jupyter Notebook open jupyter_test.ipynb.
-
Click on the first cell and hit shift+enter. The first cell should get executed properly. Do the same for all other cells (you can continuously hit shift+enter until you execute all cells).
The most common error you may encounter is "ImportError: No module named...". In such a case:
-
copy the package name,
-
close the tabs with Jupyter and in Git Bash where you started Jupyter Notebook click ctrl+c,
-
run the following command: pip install package_name
-
the package should get installed successfully,
-
after that you can open Jupyter Notebook again and test if it works now.
-
-
After you finished a piece of code in your repository, run the following commands in Git Bash (in the repository folder):
git add -A

git commit -m "Commit message"

git push
The first command adds all changes and new files for the next commit. The second command commits your changes (it's a kind of a checkpoint/save to which you can later return if need be). The third one sends your commit to GitHub (or any remote repository, in general).
Convention: For your commit messages use imperatives, e.g. "Do this, do that". Try to give informative one-liners.
-
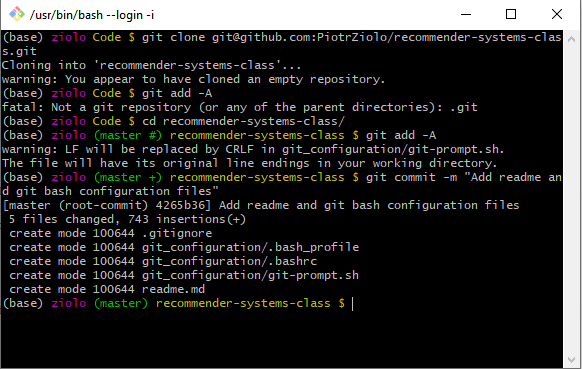
(Optional) Set up your Git Bash to make it look as below:
Copy .bash_profile and git-prompt.sh files from the git_configuration folder from this repository to your user folder (tested on Windows 10; on other systems they may need to land somewhere else).
-
(Optional) Set up SSH on your machine for easier access to your GitHub repositories through Git. You can find tutorials on the internet how to do that.
To additionally add an automatic prompt for SSH password in Git Bash, copy a script similar to .bashrc from the git_configuration folder to your user folder. In the file change the name of the key (in the given file there are two given; you can just leave one).
In the case of any problems, consult your best friend - StackOverflow.
Before every class
Fetch the new code from this repository and merge it into your code.
-
In Git Bash open your repository folder.
-
Add the original repository as an upstream:
git remote add upstream git@github.com:PiotrZiolo/recommender-systems-class.git -
Fetch new changes from the original repository:
git fetch upstream -
Merge the changes into your local branch (if you don't mind having your commits and commits in the original repository mixed up) or rebase the changes into your local branch (if you want your commits to follow all commits in the original repository):
git merge upstream/master masteror
git rebase upstream/master -
In the case of conflicts you can resolve them manually, but it's easier to use PyCharm, especially in Jupyter Notebooks where manual merging is extremely painful. PyCharm provides side-by-side view of changes and allows to accept one of the conflicted file versions in one click.
